Setting Up Multiple Pages and Multiple Admin
Setting Up Multiple Pages and Multiple Admin
I. How can one account manage multiple Pages?
1. Why do this?
Binding multiple Pages under one account enhances professionalism, efficiency, and security.
1️⃣ Brand segmentation for better focus
Each Page can represent a different product line or brand—for instance, one for apparel, another for home goods.
This allows for clearer positioning, more accurate audience targeting, and higher ad conversion rates.
2️⃣ Team-based access for better security
Through Meta Business Manager (BM), different teams can manage different Pages without sharing the main account credentials—ensuring both convenience and data security.
3️⃣ Risk diversification for stability
Facebook’s risk control is strict. A violation on one Page might affect the entire account. Managing multiple Pages distributes risk and keeps your advertising operations stable.
2. How to implement
If you already have an active Facebook account (preferably linked to both an email and a phone number), you can connect multiple Pages in two ways:
Method 1: Create a new Page
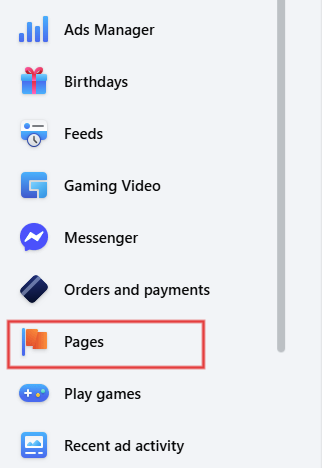
1. Go to Facebook’s left-hand menu → Pages → Create New Page
2. Fill in the Page name, category, and description
3. Once created, you can manage multiple Pages from a single account
Method 2: Join an existing Page
1. Ask the target Page’s admin to invite you via Page Access Permissions
2. Enter your email address and select your role level
3. Accept the invitation to become an admin or editor
3. Switching between multiple Pages
Facebook makes switching between Pages quick and seamless:
1. Access your Page list: On the desktop version, click Pages in the left navigation bar to view all the Pages you manage.
2. Select a target Page: Click the Page you want to work on; Facebook will automatically take you to its management dashboard.
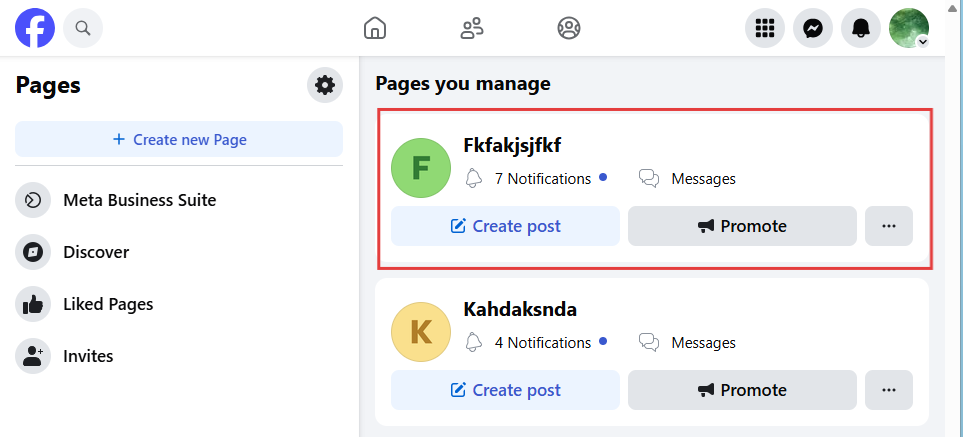
3. Manage freely: From here, you can publish posts, edit details, run ads, or view analytics.
4. Enjoy switching: If you manage several Pages, simply repeat the process—no need to log in and out of different accounts.
This improves efficiency and makes Page management much smoother.
II. Why should one Page have multiple admins?
1. Why do this?
Having just one admin may seem simple, but it introduces significant risk.
1️⃣ Centralized permissions, higher operational risk
If the sole admin mismanages or deletes key content, recovery can be difficult—or impossible.
2️⃣ Account bans, total loss of control
If the admin’s account is suspended, the Page becomes inaccessible, and both followers and content could be permanently lost.
3️⃣ Turnover risk
If the admin leaves the company without transferring access, the Page’s management can be jeopardized.
✅ Recommendation: Assign at least two admins per Page—one for daily operations and another as a backup to mitigate emergencies.
2. How to add multiple admins
Adding admins is straightforward:
1️⃣ Open the Page’s dashboard → Settings → Page Access Permissions
2️⃣ Enter the new member’s account or email → Select a role → Send invitatiot
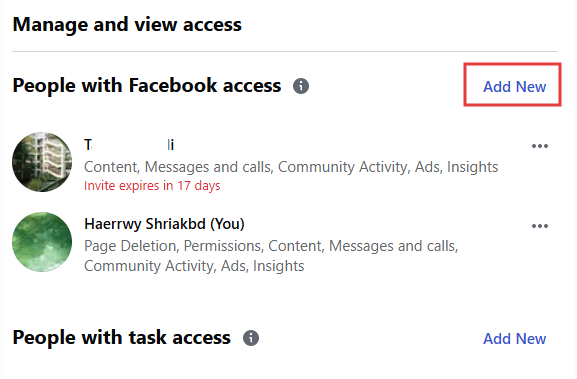
3️⃣ The invite must be accepted within 31 days to take effect
3. Roles and permissions
Facebook provides a detailed role-based permission system, allowing organizations to assign access according to responsibilities:
- Admin: Full control
- Editor: Can publish and edit content
- Moderator: Manages comments and interactions
- Advertiser: Handles ad creation and management only
- Analyst: Can view insights and data only
Organizations should follow the principle of least privilege, granting only the permissions necessary for each role.
This minimizes the risk of accidental errors while maintaining efficiency and security across teams.
III. What to do if your Page or account gets banned
Even with careful management, suspensions can happen. Stay calm and take the following steps:
- Identify the reason: Facebook usually provides a suspension notice detailing the cause—often a policy violation or risk-control trigger.
- Submit an appeal: Most cases allow for an appeal through the provided form. Explain your actions clearly and await review.
- Prepare documentation: Before submitting, gather relevant information—Page details, ad records, registered email/phone—to to verify ownership quickly.
- Prevent future issues: Managing multiple Pages, assigning multiple admins, and using limited permissions can all reduce the risk of total loss.
Was this article helpful?